Showing posts with label Tips. Show all posts

Monday, February 25, 2013

How to find a better wi-fi channel (again)

My Devolo dLAN power-line adapters stopped working recently (just not being able to find each other) and I had to go back to my old wi-fi WDS setup to connect to Xbox Live - which was working fine most of the time, but occasionally dropping connection, most annoying when in the middle of a game.

Now it's been a while since I last checked the wi-fi channels around as everything was fine for my laptop(s) and mobile phone. Will use MetaGeek inSSIDer 3 to check the signal strength - they've got a pretty good video overview for version 2.

First screenshot, from the living room (away from the router) - on channel 6 the signal strength is wavy, with a good few networks around, I guess that explains my connection dropping. (side note: I turned off my other WDS router, just to simplify things and make channel switching easier).


Trying a few channels I eventually got to channel 10 where the signal strength seems to be stable.


You're probably wondering why din't you go for channels 1-3, there's no network there?! Well, I did - 10 wasn't my first choice, I tried a few, including 1, which proved that although the signal strength was very good I was not able to connect to my network at all!!! Windows going in "limited connection" mode.


That was surprising, but coming closer to the router shows some networks I could not see from further away! So I guess it's either that or some other non wi-fi device causing the interference on that frequency, but it was completely unusable for me although the signal strength would have indicated it as a very good choice.


Some final notes:

  • try a few channels and see how they fare, rather than just go for the usual recommended (non-overlapping).
    Speedtest.net is a good test, although the actual external Internet speed may fluctuate giving you inconsistent results, run it a few times per channel. Pinging your router might give you a better (local) picture or transfer a larger file between two computers.
  • check things again when you see a drop in performance or connection. Other people turn their routers on / off at different times.
  • check that all your devices can still connect.
    Although your router might offer channels above 11, some of your devices will not be able to connect to them (e.g. Android phones) as some frequencies are not allowed in North America and the device OS / driver will not allow it even if you are living in Europe, see 802.11 Channels and international compatibility.

Tuesday, January 22, 2013

How to NTFS compress Windows WinSxS folder

You may have an older computer, a smaller SSD or a VM with little space left on the system partition, and you need a couple of GBs of disk quickly. You did all the clean-up you could with Windows Disk Clean-Up or CCleaner, then you checked what's using most your disk with WinDirStat or TreeSize Personal, and now you may be thinking that WinSxS folder is quite large... I don't know about cleaning it up, but you can definitely try compressing it at filesystem level.

Before we go on, now it might be a good time to do that system partition backup you've been putting off for so long, just in case.

1. Start a Command Prompt (cmd.exe) as Administrator, in which to run the commands below.

2. Stop and disable Windows Installer and Windows Module Installer services (see sc):
sc stop msiserver
sc stop TrustedInstaller

sc config msiserver start= disabled
sc config TrustedInstaller start= disabled

3. Backup ACLs for WinSxS folder (see icacls), so we can restore later:
icacls "%WINDIR%\WinSxS" /save "%WINDIR%\WinSxS.acl" /t

[...]
Successfully processed 44231 files; Failed processing 0 files

4. Take ownership of WinSxS and subfolders (see takeown):
takeown /f "%WINDIR%\WinSxS" /r

SUCCESS: The file (or folder): "C:\Windows\WinSxS" now owned by user "COMPUTER\User".
[...]
SUCCESS: The file (or folder): "C:\Windows\WinSxS\x86_xnacc.inf_31bf3856ad364e35_6.1.7600.16385_none_b381dfe1d4da7da9\xnacc.sys" now owned by user "COMPUTER\User".

5. Grant full rights on WinSxS to your user:
icacls "%WINDIR%\WinSxS" /grant "%USERDOMAIN%\%USERNAME%":(F) /t

processed file: C:\Windows\WinSxS
[...]
Successfully processed 44231 files; Failed processing 0 files

6. Compress WinSxS files and sub-folders (see compact).

Some files might still be in use by say Explorer, you can see that by running the command without /i parameter so that is stops on first file in use and then use CTRL+F in Process Explorer to search for the file name. It should compress most of the files anyways, so we'll ignore those.
compact /c /s:"%WINDIR%\WinSxS" /i

[...]
43653 files within 8596 directories were compressed.
6,021,146,695 total bytes of data are stored in 4,102,382,853 bytes.
The compression ratio is 1.5 to 1.

7. Restore ownership back to TrustedInstaller:
icacls "%WINDIR%\WinSxS" /setowner "NT SERVICE\TrustedInstaller" /t

processed file: C:\Windows\WinSxS
[...]
Successfully processed 44231 files; Failed processing 0 files

8. Restore ACLs for WinSxS folder we saved earlier.

Notice the command line doesn't specify WinSxS folder, but its parent (%WINDIR%) - it's because icacls stores paths starting with WinSxS in the .acl file; open up the file with Notepad or see more here.
icacls "%WINDIR%" /restore "%WINDIR%\WinSxS.acl"

processed file: C:\Windows\WinSxS
[...]
Successfully processed 44231 files; Failed processing 0 files

9. Delete WinSxS.acl file (cleanup)
del "%WINDIR%\WinSxS.acl"

10. Restore Windows Installer and Windows Module Installer services:
sc config msiserver start= demand
sc config TrustedInstaller start= demand

* * *

Original (before)
Compressed (after)


Wednesday, December 26, 2012

Windows: Keyboard repeat delay (short)

One of the first few things I do on a new Windows installation is to change the keyboard repeat delay to short. It helps me with arrow navigation or backspace in code or text files, address bar or contents in web browsers etc. Some people get used to pressing a key repeatedly, but I like this one more.

Go to Control Panel > Keyboard > Speed > Character Repeat > Delay

Drag the slider to the right, then give it a test in the area down at the bottom.


Friday, November 23, 2012

Eclipse - “Show heap status”

One of the problems people complain about when starting with Eclipse is that it is slow. Then if you search the web you are advised to allocate more memory (RAM) to Eclipse (Java), but how much should you really?

Well, it all depends on the size of your project and the plugins that you use. Allocate too little and Java Garbage Collector will consume a lot of CPU going through the heap trying to remove discarded objects to make room for new ones, allocate too much than you system has free (available) and it will swap extensively to disk (“swap” file) to give you more free RAM.

How would you know if you allocated enough to Eclipse or you might need to allocate more (provided that you see you have the free memory available). This is where Eclipse “show heap status” feature comes in handy.

First of all you need to enable it: Windows > Preferences > General > Show heap status. It will show this little graph in the status bar:
  • left area (lighter) is how much heap it uses at the moment.
  • right area (darker if you right-click it and check show “Heap Max”) is how much is available from what pre-allocated (either through –Xms startup parameter or pushed past –Xms towards –Xmx)
  • hover to get the details in a tooltip;
  • click the garbage can to force a Garbage Collection.

Then look at it while using the project (build etc) – if the heap usage goes towards maximum, the colour will turn red showing that it might be struggling. You can force a garbage collection using the “garbage can”, but that’s a workaround just to finish the job instead of having to restart Eclipse. Use it too much and the JVM will pause to force an early GC.

In my example I have both minimum (-Xms) and maximum (-Xmx) heap size set to the same values (384MB) and at that moment was only using 41 MB out of it (it pre-allocated though the minimum from the system at startup). As you will be using the project it will go up and down, as needed and as GC will do it’s job.

[...]
--launcher.XXMaxPermSize
256M
[...]
-vm
C:\Program Files\Java\jdk1.7.0_09\jre\bin\server\jvm.dll
-vmargs
[...]
-Xms384m
-Xmx384m
So why is my eclipse.exe (javaw.exe) process using 600 MB of RAM when I’ve set my heap to 384 MB? It’s because Heap is not everything, there’s also the Permanent Generation (PermGen) and a few other things, so consider those as well when you decide to increase heap. On Windows use a tool like Process Explorer to see all these details – system commit, free RAM, process private bytes, working set etc.

Thursday, August 9, 2012

Squirrel SQL – cannot update on Windows with UAC enabled

I had this problem before but I just worked around it by simply copying the updated installation from a Windows machine that didn’t have User Account Control (UAC) enabled – with SQuirrel SQL 3.4.0 update now available, thought I might look into it and see what’s causing the problems. Sure, if you are installing SQuirrel SQL into a folder somewhere that doesn’t require elevation, you should not have this problem – thing is I usually install it on Windows servers with UAC enabled and place it in %ProgramFiles%.

First of all, obviously, you need to first run SQuirrel SQL elevated (right click > Run As Administrator), otherwise when using the update feature it will fail promptly, as it wants to download the updated .jars into a subfolder of Squirrel SQL home.


Running Squirrel SQL as Administrator this time, will download the updates just fine.


Now the problem is, if you close and restart SQuirrel SQL not elevated, it will prompt to install the updates, but will fail as it doesn’t have the rights to update the libraries.

If you run it elevated though, it won’t prompt you to install the updates!!! Now that’s annoying…

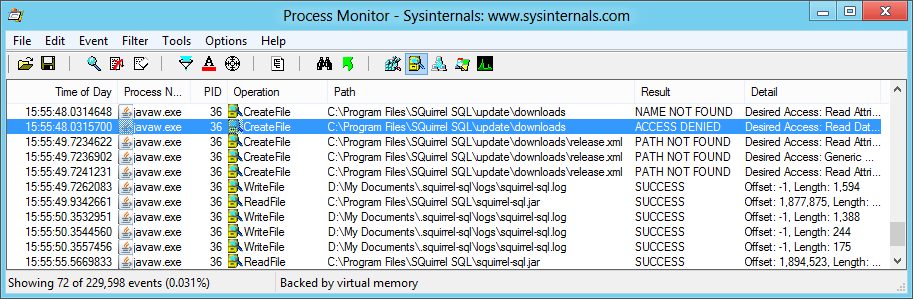
Process Monitor to the rescue (again) showing that SQuirrel SQL is looking for the listing file in %WINDIR%\System32\update ?! Odd alright… The javaw.exe process in Process Explorer shows something that explains it: the current directory of the elevated process is not the one specified in the shortcut, but %WINDIR%\System32 !


Looking at squirrel-sql.bat it seems to prepare the home location into a UPDATE_PARMS environment variable, but maybe it’s not used by the application and it should be really added to the command line?!

The quick solution is to add a change-directory command to the SQuirrel SQL home - that way it will work when running under normal privileges (the same working directory is coming from the shortcut), as well as when running elevated (when current directory is %WINDIR%\system32).
SET UPDATE_CP=%TMP_CP%
SET UPDATE_PARMS=--log-config-file "%SQUIRREL_SQL_HOME%\update-log4j.properties" --squirrel-home "%SQUIRREL_SQL_HOME%" %1 %2 %3 %4 %5 %6 %7 %8 %9
cd /d "%SQUIRREL_SQL_HOME%"
"%LOCAL_JAVA%" -cp %UPDATE_CP% -Dlog4j.defaultInitOverride=true -Dprompt=true net.sourceforge.squirrel_sql.client.update.gui.installer.PreLaunchUpdateApplication %UPDATE_PARAMS%
I’ve added my findings to a related ticket:
https://sourceforge.net/tracker/index.php?func=detail&aid=2759952&group_id=28383&atid=393414

Update:

D’oh! now I see it, thanks to Notepad++ word highlight feature! The environment variable is defined as UPDATE_PARMS, but the one in the command line is UPDATE_PARAMS! so I guess now you have two solutions :-)

Monday, July 30, 2012

Registry Editor - Adding favorites (bookmarks)

This is a less known but very handy feature when you’re making repeated registry changes to test things, helping you to get very quickly to specific locations.

For example every time I install a new Citrix Client I may have to uninstall the old one first and then go back and change a couple of registry keys (in this case to always send the Windows keys combinations to the remote desktop, pass-through ).

The alternative is to export the entire branch from File menu and re-load at later time – that’ll export all sub-keys and values into a .reg file, which you can edit afterwards with say Notepad to keep only the ones you want to re-load later (just in case others may have changed and will not want to overwrite the entire branch).

Regedit - Add Favorite

Sunday, July 1, 2012

Running a command / application as Local System

Occasionally you may need to run a command or application as Local System, say a service application that doesn’t produce enough log information and fails due to security rights.

One way to do it is by scheduling a command through Windows Task Scheduler, as explained here:
http://blogs.msdn.com/b/adioltean/archive/2004/11/27/271063.aspx?Redirected=true

But I find easier to use psexec.exe from Sysinternals’ PsTools package.
http://technet.microsoft.com/en-us/sysinternals/bb896649.aspx

Not only you can run an application locally, but you can also use it to run it on another machine remotely; run psexec without parameters to get a list of options.

psexec –s cmd.exe

psexec - local system

Thursday, April 12, 2012

JBoss 4.2.3 with VisualVM

I have recently been involved in implementing and testing our application in a high volume / high performance customer case, where I thought I might try using VisualVM to see the JVM in action and find potential bottlenecks, like where would most of the CPU usage would go (the module I’m writing is a big CPU hog) as well as maybe latency issues caused by inadequate garbage collector settings.

The screenshots below are taken from a much smaller test environment where I just ran a quick test, but I have been able to use the tool in the customer environment where we were able to identify occasional high CPU usage with garbage collection (the blue line in the CPU area, left) as well as OutOfMemory problems due to the default garbage collection strategies (notice the erratic/irregular shapes in heap usage on the right side) - both can be addressed by adjusting the garbage collector strategy for low pause, concurrency (using -XX:+UseConcMarkSweepGC and -XX:+UseParNewGC parameters, see "before" and "after" screenshots below).

Also we found high CPU usage on certain application threads that now we can focus to optimize the code in those areas, they are not part of these screenshots, but I might post separately on that. Also from the threads graph is visible we have a high number of threads  with a short life span, probably around the JMS connectivity area that we’re still investigating.

I’m nowhere even close to being an expert on these things, I’m still learning the stuff, but since I struggled a bit to get the JMX enabled with JBoss 4.2.3, though I might share the findings others might find useful and why not even got some more qualified suggestions from you, the readers out there.
We’re using the Java Service Wrapper (just to give you another example of how to use the parameters) and these are the settings I used to allow for remote JMX connectivity (the port is your choice really):
wrapper.java.additional.14=-Djavax.management.builder.initial=org.jboss.system.server.jmx.MBeanServerBuilderImpl
wrapper.java.additional.15=-Djboss.platform.mbeanserver
wrapper.java.additional.16=-Dcom.sun.management.jmxremote
wrapper.java.additional.17=-Dcom.sun.management.jmxremote.port=9999
wrapper.java.additional.18=-Dcom.sun.management.jmxremote.ssl=false
wrapper.java.additional.19=-Dcom.sun.management.jmxremote.authenticate=false
Once setup you can just run VisualVM and point it to localhost:9999 if you’re going to do the monitoring locally, although probably for a high performance environment you might want to run VisualVM from another machine, so it doesn’t affect the environment too much. Just as well, with the JMX enabled you can probably use that from a monitoring application and set warning thresholds for things like free JVM memory, high CPU usage etc.

VisualVM seems to be quite a capable tool (not to mention easy on the eye), giving you real time information through the graphs, being able to take memory dumps to analyze offline (with say the likes of Eclipse Memory Analyzer), perform garbage collection, take thread dumps, look at active / dead threads or run a CPU sampler to see the top consumer threads.


Wednesday, April 4, 2012

Windows Command: How to get the script path

I had to do this a few times every now and then and I always forget the syntax, but I do remember how to get it: from for /? help.

%~0 is the first parameter, which is the full path of the script; ~dp0 will give you the drive and path without the filename, e.g. echo "%~dp0"

You can obviously also set that into a working environment variable and use it throughout the script.

Windows Command - script path

TortoiseSVN installation: “insufficient privileges”

You are an administrator, you were either asked to elevate or ran the installer “as administrator” yourself, but still getting this error:

The installer has insufficient privileges to access this directory: C:\Program Files\TortoiseSVN\bin.
The installation cannot continue. Log on as administrator or contact your system administrator

TortoiseSVN - insufficient privileges

Well, it might have nothing to do with the privileges, but rather with the fact that the TSVNCache.exe is still running when the installer is trying to replace it with a new version.

TSVNCache - ProcExp

I guess you got two options here:
  1. kill the process and push the retry button, where you might need to logoff and log back in (or restart) to get the process back, or
  2. first change the option in TortoiseSVN Settings > Icon overlays > Status Cache from Default to Shell, in which case it might need to kill your Explorer as part of the installation.
Personally I prefer the first one, haven't seen any problems with it.

TortoiseSVN - Settings - Icon Overlays

Sunday, February 19, 2012

Kernrate Viewer, VMware Player, Intelppm

Reading this article on high CPU spikes on Mark Russinovich’s blog the other day found about Kernrate Viewer, coming very handy when looking at some high kernel times today on a Windows XP (x32) VM running locally in VMware Player 4.


A quick search found this article on Virtual PC Guy's blog – setting the two registry keys from 1 to 4 seems to have somewhat solved the problem, although now “hal” is showing quite high, I might need to look into that a little further...

Update 28 March 2012

You may find that after the registry change that vmware-vmx.exe will exhibit constant high CPU consumption on the host system, in which case you might want to revert back to the default registry values.

Wednesday, October 26, 2011

Cleaning your laptop fan

The other week I decided to open up my missus’ old Vaio laptop as it was having problems with some keys not typing and using pressurized air didn’t seem to do anything. 20 or so screws later, having to take the keyboard out, the keyboard cable, the touch-pad cable, some of frame, anyways a lot of work, I could see the fan at the back and said hey, I should have a look at that as well as I noticed it was struggling lately.

I thought at first that it wasn’t able to cope with today’s Flash applications and things like Yahoo Messenger and so forth – it’s an old 1.2 GHz Pentium M Mobile CPU – but man you should’ve seen the crap it collected in there over the years; dust burned to a black char got stuck in the radiator and the fan was struggling to push the air out without much success. I should’ve taken a few pictures, but it didn’t seem like something anyone would do, I said ok it had its years, it only happens to old laptops...

And I couldn’t be more wrong, cause the next day I said, ok how about my 2 years old Dell Vostro? Luckily Dell Vostro has a much better design where you can access the memory, fan and the CPU under this panel held by a couple of screws. Below you can see a couple shots with the crap in the radiator and fan blades.

To clean up, I use pressurized air and an old toothbrush for radiators, then for the fan blades cotton swabs with medicinal spirit, slowly going through the blades holding the fan so it doesn't rotate to make it easier - it’s not like I do it every day and 5 minutes later you’re done anyways.

It made quite a bit of difference to the old laptop, the fan doesn’t go on high as often and the one on my Vostro barely kicks in every now and then. For some reason I thought before blowing air (pressurized or human powered) through the vents was enough to get the stuff out of the fan, now I think I will do the real thing again every couple of years.


Thursday, March 10, 2011

How to change marked occurrences colour in Eclipse

This is something that bugs me every time I setup a new workspace in Eclipse, as I find the default Eclipse highlight background colors quite bland – I think it used to be some light yellow for both of them in previous versions... I decided to post about it this time as it happened a few times already and as odd it might sound I sometimes use the information from my blog (what?), that way I only need to remember there was a solution even if recalling all details.

If you use the “Mark Occurrences” feature, whenever you move the cursor to a member, local variable, method etc. Eclipse will highlight the occurrences in the editor as well as on the side ruler (for easy navigation in a large file). In newer Eclipses I think they even broken down the concept into two types – “write occurrence” for the actual variable definition and “occurrence” for when it is used.


If you want to change the default highlight colours you can do so in the Preferences > General > Editors > Text Editors > Annotations – look for “Occurrence annotation” and “Write occurrences”.


You might need to close editors and re-open them to get the new highlight colors.

Wednesday, January 19, 2011

Troubleshooting Nonpaged and Paged Pool Errors in Windows (Ben Lye)

http://www.simple-talk.com/content/article.aspx?article=970

Ben Lye uncovered a memory leak in the nonpaged pool which was crashing his servers with disquieting regularity. Luckily it was relatively easy to troubleshoot, and he's sharing the tools and techniques he used to get his servers back on track in double-quick time.

Having troubles with one of our development servers (non paged pool, event ID 2019) I found this blog post very easy to follow. Also a must read is Mark Russinovich's Pushing the Limits of Windows: Paged and Nonpaged Pool blog post going into some more detail.

Tuesday, December 7, 2010

How to find your Windows installation date

To find my Windows installation date I usually looked at C:\WINDOWS creation date, but right now that seems a bit older than I remember...

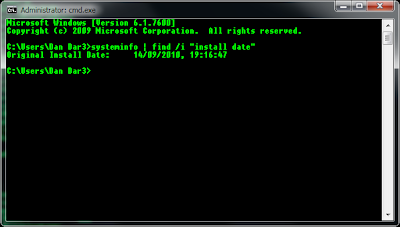
A more reliable way is to ask Windows about it and that is through System Info tool, filtering for "install date".

Start a command line (cmd.exe) and type:

systeminfo | find /i "install date"

Saturday, July 10, 2010

My case of Windows 7 0x0000007b BSOD

We’ve started rolling Windows 7 x64 Enterprise at work with new laptops and thanks to a colleague in IT I was enrolled as well for my work Dell Latitude D630 laptop running Windows XP Professional, but I was going to do it myself at home over the weekend.

After backing up my files on an external USB drive and restoring the Norton Ghost image (I did manage to restore just the system partition so I could’ve kept the others untouched, but it wasn’t worth risking), then I had to go through the recovery process and let Windows 7 repair the boot so that replaces the Windows XP boot manager. That is a nice tool and it works in most cases, what it doesn’t do is help with ATA vs AHCI modes.

And this is where the troubles begun – I understand that the image was preset for ATA mode, while previously my XP was configured for AHCI mode, and therefore I was hit hard with 0x0000007B (0xFFFFF88009A9928, 0xFFFFFFFFC0000034, 0x000000 …)  BSOD.

I figured that it must be  because of that so I went in BIOS and changed from AHCI to ATA. Trouble was that it didn’t solve the problem… Went again through the Windows 7 recovery mode, nothing.

Googling the problem I found that most of the solutions were suggesting to change the SATA mode in BIOS, but that didn’t solve it for me (I changed to both, reset the BIOS setting etc no luck)– some explained that Windows loads either the AHCI or ATA drive as configured. Then I found this Microsoft KB (http://support.microsoft.com/kb/922976) that says how to change the registry keys to enable AHCI mode.

BUT how to change the registry keys when my Windows wasn’t booting up?! What I didn’t know is that you can run regedit.exe from the recovery console and then load the SYSTEM hive from HDD, change the registry keys and then unload it!!!

Searching for “how to edit registry files from recovery console” I found this article - http://windowsxp.mvps.org/peboot.htm - which was written for something else but I could use it to load the SYSTEM hive from C:\Windows\System32\Config\SYSTEM, went in both ControlSet001 and ControlSet002 (to be sure :-) and changed the two Msahci\Start and IastorV\Start to 0 (from 3), rebooted with AHCI mode in BIOS and BINGO, my new Windows 7 was booting fine now!

Case closed - thanks to other people sharing the information, I thought I should do the same and pay it forward…

PS: If your system supports and has AHCI enabled you can install Intel Rapid Storage for an updated driver from here (search for Intel Rapid Storage – it is not detected automatically). Intel Rapid Storage Manager used to be called Intel Matrix Storage Manager.

Saturday, March 27, 2010

XBMC for Xbox – how to disconnect an FTP connection

You might have the case where you are transferring files to your Xbox Media Center and it gets disconnected (usually through wi-fi) and when your FTP client will try to re-connect it will be denied, as there are only two simultaneous connections allowed, you will have to wait for a minute (the default timeout) or reboot the Xbox.

If you don’t want to wait or if your Xbox is in the other room, here is how you can close those hung connections from your Windows PC.

To allow remote admin connections, connect through FTP, download Q:\System\FileZilla Server.xml and edit on your PC to change the Admin IP Addresses to match your network IP address class (in my case, 10.0.0.* - default is 192.168.0.*), then upload back.


Install an older version of the FileZilla Server like. 0.8.9 from here - that is because the protocol has changed in later versions. You can uninstall the application and only keep the FileZilla Server Interface.exe if you want.

Run the FileZilla Server Interface and connect to your Xbox (default password is xbmpzilla, it can also be changed in the above XML configuration file).


On the right side you will see the active connections, right click one of them and use “Kick” to disconnect. Simples!


An added benefit from using the FileZilla Server Interface is that now you can change server settings without having to download and edit the XML configuration file every time ;-) not that you should need to, but but might be useful.

Single Instance Application in C# (per session)

Sometimes you want to only allow for a single instance of your application and that can be accomplished by using a Mutex class. On top of that, if it’s used on a Terminal Server / Citrix, you also want to check the session id, to ensure you’re not interfering with other user’s instances or even the same user on a different connection.

EDIT: On a second read, the SID might not be needed in the mutex name, as by default the mutex is local, unless told otherwise, see note below:

http://msdn.microsoft.com/en-us/library/system.threading.mutex.aspx

* * *

[DllImport("user32.dll")] 
[return: MarshalAs(UnmanagedType.Bool)] 
static extern bool ShowWindow(IntPtr hWnd, int nCmdShow); 
 
[DllImport("user32.dll")] 
[return: MarshalAs(UnmanagedType.Bool)] 
static extern bool SetForegroundWindow(IntPtr hWnd);
 
// Constants 
const int SW_RESTORE = 9;
 
/// <summary> 
/// The main entry point for the application. 
/// </summary> 
[STAThread] 
static void Main() 
{ 
  // 
  // Use a Mutex to allow only one instance per session...  
  // 
  bool   newInstance = true; 
  String mutexId     = String.Format("APP={0}; SID={1}",
                                     Assembly.GetExecutingAssembly().GetName().Name, 
                                     System.Diagnostics.Process.GetCurrentProcess().SessionId); 
 
  Mutex mutex = new System.Threading.Mutex(true, mutexId, out newInstance);  
  if (!newInstance) {
    MessageBox.Show("Application Already Running!" + mutexId);
 
    // Find the instance holding the mutex and restore...  
    Process currentProcess = Process.GetCurrentProcess();  
    foreach (Process process in Process.GetProcessesByName(currentProcess.ProcessName))  
    {  
      if (process.Id        != currentProcess.Id &&  
          process.SessionId == currentProcess.SessionId)  
      { 
        // Restore window (if minimized)... 
        ShowWindow(process.MainWindowHandle, SW_RESTORE); 
 
        // Set foreground window... 
        SetForegroundWindow(process.MainWindowHandle);
 
        break;  
      }  
    }  
    return;  
  }
 
  //  
  // Run normal...  
  //  
  Application.EnableVisualStyles();  
  Application.SetCompatibleTextRenderingDefault(false);  
  Application.Run(new MainForm()); 
 
  //
  // Hold the mutex from being garbage collected... 
  //
  GC.KeepAlive(mutex);
}

Resources:

Wednesday, March 3, 2010

Windows 7 system waking up at night

A common reason for a computer to wake up is that a network interface was configured to Wake on LAN (WoL) (usually company computers) – that means it can wake up due to a link change signal or a Magic Packet. This feature can be quite useful if you want to wake up your work computer, first logon through the company VPN and then run a WoL software from one of the Citrix / Terminal Server sessions (usually WoL packets are not allowed through gateways from the Internet). Nowadays even wireless network devices allow for WoL (depending on BIOS and motherboard).

To disable (or enable) WoL, see this article below for more details – simply check/uncheck the the box that says “Allow this device to wake the computer” accordingly. The “Only allow management stations to wake the computer”  I believe it means to wake up only on Magic Packet requests.

http://www.howtogeek.com/howto/windows-vista/fix-sleep-mode-randomly-waking-up-issue-in-windows-vista/
image

Another reason for your Windows system waking up, and probably more common to Windows 7 editions including Media Center (e.g. Professional), is that if the computer supports APM 1.2 or later it is possible to have tasks that can wake up the system from S4 (Hibernation) or S5 (Power Off) – most common seems to be the case with the Media Center Update scheduler task – see more details below.

http://www.beirtech.com/blogs.php?action=view&bid=6

Notice the “Wake the computer to run this task” is checked - either uncheck the box (double click the task scheduler entry to edit) or simply disable the task altogether.


Friday, February 12, 2010

Shrinking the system partition in Windows 7

Most new computers are coming with one large partition where the OS and applications are installed. Personally I like to have a separate partition for OS and one or more for other things, like say one keeping your personal files and other ones for backups etc. The advantage is that if you want to reinstall the OS, once that’s done you can simply change the location of your documents to where you put them on one of the other partitions – this used to be much easier in XP, where you could’ve just right-clicked My Documents on your desktop and change the location to say D:\My Documents. It seems in Windows 7 you have to go and do that for all your folders in your profile folder on your desktop, or you could move them in bulk and I believe Vista/Windows 7 will update the paths in the registry as well.

Back to shrinking the one big partition, I didn’t know until I searched just now the Internet that Vista and Windows 7 have a partition shrink option in Computer Management > Disk Management. One limitation is that files like swap, hibernation or even system restore files can be in the way, preventing you from shrinking a partition down to the size you want. One solution is to disable / turn them off, reboot and defrag the drive before attempting the shrink operation. Windows Defrag does not compact the free space, but there are other tools out there that can do that – one of my favourites is Raxco PerfectDisk, they have a trial version you could try on.

Here’s a good tutorial on shrink feature and solutions:
http://www.howtogeek.com/howto/windows-vista/working-around-windows-vistas-shrink-volume-inadequacy-problems/

imageimage

As you can see from the screenshot above, it only allows me to shrink the partition with a mere 1.2 GB – see the black blocks in the middle of the partition and also the files at the end of the partition in PerfectDisk.

image Disabling the page file from My Computer (right-click) > Properties > Advanced System Properties > Performance (Settings) > Advanced (tab) > Change. Select No paging file and click Set, then OK.

image Hibernation has to be disabled from an elevated command line window (administrator) using powercfg –h off command.

image

System restore can be turned off from My Computer (right click) > Properties > System Protection (tab) > select each drive and use the Configure button to turn off system protection.

image

One reboot later, run PerfectDisk again and you can see the black blocks are gone. Now defrag the partition with the option to consolidate free space, that’ll push the files at the start of the partition.

image

Once that’s done, notice that although the files are all now at the start of the partition, there could still be some system files (notice the grey boxes in the middle of the white space) left. You need to use the System Files defrag (toolbar button) – that will require a reboot, as the offline defrag needs to be done as part of the Windows system boot tasks.

image

If you find that the pesky metadata won’t move (apparently the preferred position seems to be somewhere in the middle of the partition), one solution is to try to shrink the partition as much as possible, do the offline defrag process to move the metadata in the middle, consolidate the free space and repeat if necessary until it allows you to shrink down to the size you want (in my case 96 GB for the system partition). Once the system partition is shrunk, you can create other partitions in the newly create free space.

imageThe whole process can be a pain in the neck, obviously the easier solution is to use a proper partitioning tool that is certified with Windows 7 - otherwise Windows might not like it and you will need to repair Windows (as it happened in the past when using GParted).

Ah well, a couple of hours down the drain I managed to shrink the system partition and created a new one and still have a running system, I can only wish you the same. Makes you wonder if it wasn’t worth the 5 euro for get the custom partitioning when ordering the system on Dell’s website or getting some proper partitioning tools...

VERY IMPORTANT:
Once done with the system partition you should enable back the swap file, hibernation (powercfg –h on) and system restore.