Monday, December 21, 2009

Lotus Notes tip – OptimizeImagePasteSize

lotus-notes-logo 
This is a setting that will considerably reduce the size of a Lotus Notes message by compressing the images pasted into a document.

* * *

http://www-01.ibm.com/support/docview.wss?rs=899&uid=swg21136853

SPR# TOHA673FH2 - Setting the notes.ini variable, "OptimizeImagePasteSize=1", converts all bitmaps and metafiles to .gif files when pasted into a document. Without this setting, bitmaps and metafiles take up a large amount of space causing the size of documents to be larger then necessary.

* * *

http://www.ibm.com/developerworks/lotus/documentation/notes-ini/ktoo.html#O

In releases prior to 8.5, there is no UI equivalent. Beginning with release 8.5, you can set a Basic Notes Client Configuration preference instead of using a notes.ini setting. Under Additional options, check Compress images pasted into documents.

Saturday, December 12, 2009

Windows shortcut keys pass-through with Citrix client

IT had us switch from Windows Terminal Services to Citrix recently and feeling a bit frustrated with Citrix client not passing through the Windows keys (like ALT+Tab or Win+R) but only in full-screen.

Citrix ICA File Creator is very handy in creating .ica shortcut files pretty much like you would rdp connection files with Remote Desktop Connection client.

Once you create the .ica file you can edit it with a text editor (.ini file structure) to add the setting to always pass-through the Windows keys to the remote session:
[WFClient] 
TransparentKeyPassthrough=Remote
From what I read the possible values are Remote, Local and FullScreenOnly. Personally I like the Remote option, that sends the keys over when the Citrix client window is the active application.

* * *
Update 26 Apr 2012

With Citrix Receiver 3.2 I cannot seem to change this in the plugin settings, but this Windows registry key should do it - see http://support.citrix.com/proddocs/topic/ica-settings/ica-settings-transparentkeypassthrough.html

Windows 7 x64 Enterprise edition – for all users:
HKEY_LOCAL_MACHINE\SOFTWARE\Wow6432Node\Citrix\ICA Client\
Engine\Lockdown Profiles\All Regions\Lockdown\Virtual Channels\
Keyboard\TransparentKeyPassthrough = Remote

Wednesday, December 9, 2009

Lotus Notes 8 Themes

Although Lotus Notes 8 looks much better than 6.5 (but still 20 years behind Outlook :-), here’s how you can install a couple of new themes, so your Notes stands out of the crowd - I like the blue Royale one.

Download theme pack:
http://www.openntf.org/Projects/pmt.nsf/HomeLookup/44BCBC4C400264D38625757C00558971?OpenDocument

Installation notes:
http://www.openntf.org/Projects/pmt.nsf/HomeLookup/4DBB139566C5F6738625757B0053471D?OpenDocument

  1. Unzip the Themes.zip file to get Theme_updatesite.zip for installation;
  2. Go to ...\Notes\framework\rcp folder.
  3. Add "com.ibm.notes.branding/enable.update.ui=true" to the end of file plugin_customization.ini
  4. Restart Notes 8. Then from Notes 8 client you can use menu "File -> Application -> Install" to install Eclipse based applications.
  5. Choose "Search for new features to install".
  6. Choose "Add Zip/Jar Location...", then select the Theme_updatesite.zip file;
  7. Follow the instruction to complete the installation.
  8. After installation, Notes needs to restart;
  9. Click on menu File->Preference to open preference page, select the "Windows and Themes" page. In the Theme section, you will see new installed themes. Select one and click "OK" to apply the theme.
Lotus Notes - Royale Theme

Sunday, November 29, 2009

XBMC SVN Installer v1.0 – XBMC program plugin

News and skins from XBMCSVN.com (aka SSHCS).

Notes:

  • This plugin does not download builds - Xbox users should continue using T3CH Upgrader script to get the builds.
  • Skins may not extract correctly on Xbox - maybe something about the RAR version not being supported on Xbox...

Download:

Screenshots:

XBMC SVN Installer 1 XBMC SVN Installer 2 XBMC SVN Installer 3 XBMC SVN Installer 4 XBMC SVN Installer 5 XBMC SVN Installer 6

Wednesday, November 18, 2009

Catalyst “Mobility” 9.11 Vista legacy drivers on Windows 7

Same procedure as before, with the difference that this time the setup worked fine, except for an error at installing the Microsoft Visual C++ 2005 SP1 Redistributable (I don’t know what the implications are on this one…). Driver seems to be working fine in full resolution (1920x10200) on a Dell Inspiron 9300 (ATI Mobility X300).

ATI Catalyst Display Driver v9.11
http://support.amd.com/us/gpudownload/windows/Legacy/Pages/radeonaiw_vista32.aspx

radeon_mobility_9_11_setup radeon_mobility_9_11_driver

Tuesday, November 10, 2009

How to customise the Services management console (services.msc)

For years I wanted to change the Services management console (services.msc) to start by default with the Standard tab - the Extended view is nice with the description and tasks on the left side, but it takes that space and I can simply run the tasks from the toolbar.

Here’s a very useful tip from Petri IT Knowledgebase website on how to “author” .msc files (had no idea you could do that) and change the default tab, columns and window sizes etc. I tried it on Windows 7 and I couldn’t overwrite the %WINDIR%\System32\services.msc for some reason (didn’t complain but I didn’t see the changes taking effect), but I could save it as a separate .msc file, which is good enough, I usually keep shortcuts on my desktop anyways…

Sunday, October 25, 2009

Saturday, September 12, 2009

XBMC Xbox Trac Changelog v1.0 – XBMC plugin

XBMC plugin to browse the XBMC for Xbox Trac changes from http://xbmc.org/trac.

Big thumbs up to Team XBMC in general for their work, and especially to the guys maintaining the Xbox branch.

Download:

Screenshots:

xbmc xbox trac changelog 1 xbmc xbox trac changelog 2

xbmc xbox trac changelog 3

Friday, August 28, 2009

Catalyst “Mobility” 9.3.1 Vista legacy drivers on Windows 7

Windows 7 RC default drivers for ATI Radeon Mobility X300 are working fine on my work Dell Inspiron 9300 with Aero Glass and all, but let’s try to push it a bit further.

ati_mobility_931_1

Download Catalyst Radeon 9.3.1 legacy desktop drivers for Windows Vista x32:

http://support.amd.com/us/gpudownload/windows/Legacy/previous/Pages/radeonaiw_vista32.aspx

Run the package and let it extract the drivers - usually to a path like X:\ATI\Support\9-3_1_legacy_vista32-64_dd_ccc – then cancel the installation.

Download and run DriverHeaven’s Mobility Modder to modify the drivers package (see similar notes on the application download page).

ati_mobility_931_2

I’ve tried then to run the setup.exe from the driver package as the instructions say on the Mobility Modder page, but the driver didn’t show up in the list, so I went and update the driver manually through Computer Management > Device Manager > Display adapters > ATI MOBILITY RADEON X300 > Driver (tab) > Update driver > Browse my computer for driver software > Let me pick from list of device drivers on my computer > Have Disk > X:\ATI\Support\9-3_1_legacy_vista32-64_dd_ccc\Packages\Drivers\Display\LH_INF > etc. Reboot when prompted.

ati_mobility_931_3

The updated driver didn’t change the graphics rating and I couldn’t notice any performance increase, but I’ll keep the drivers if no problems appear.

ati_mobility_931_4 
Note: I have tried the same procedure on ATI Catalyst 9.8 desktop drivers, and although the driver is being presented through the manual update procedure, on reboot I lost the Aero Glass and the maximum resolution allowed was 1600x1200. Which probably makes sense, since ATI has dropped support for the legacy chipsets in newer drivers, even if the Modder makes them appear in the .inf file.

Thursday, August 27, 2009

Catalyst 9.3.1 Vista legacy drivers on Windows 7

ATI’s made the Catalyst 9.3.1 Legacy Display Driver for Windows Vista 32bit work fine on Windows 7 now, no need to do any hacking, of course it comes with the note saying that’s not officially supported.

http://support.amd.com/us/gpudownload/windows/Legacy/Pages/radeonaiw_vista32.aspx

ati_radeon_931 
I don’t know about yous, but this gives my old system (Intel P4 3.0 GHz Prescott, 2 GB RAM, ATI Radeon 9600XT) a new lease of life, Windows 7 is working pretty much as fast as Windows XP, maybe with a little more HDD activity (although I stopped Superfetch service and turned off write-cache buffer flushing), but generally fairly happy with it. It works fine with the Aero Glass and all the nice stuff, haven’t missed running any software yet, heck, even old Halo (2003) works no problems.

Sunday, August 2, 2009

ATI Catalyst Mobility 9.3 – Windows XP driver

I’ve been looking for a while for an updated driver for ATI Mobility X300 in my Dell Inspiron 9300 work laptop running Windows XP - Dell’s driver dated back to 2005. I don’t know if this is going to help anyone nowadays when all the buzz is Vista and Windows 7, but it’s a keeper anyways as you can’t seem to be able to get it from AMD’s website.

ATI Catalyst Display Driver
http://support.amd.com/us/gpudownload/windows/Legacy/Pages/radeonmob_xp.aspx?type=2.4.2&product=2.4.2.3.4&lang=English

Driver package (OpenDrivers.com)
http://download1.opendrivers.com/uploaddrv/display-and-video/ati-technology/9-3-mobile_xp32_dd_ccc_enu.exe


Saturday, July 4, 2009

Add Ubuntu 9.04 to Windows XP boot manager

I was quite impressed with Ubuntu lately, we’ve been using it at work a couple of weeks ago to recover data from a 7 years old Windows server that wasn’t able to boot properly (high CPU usage on services.exe, with no actual services started) – thanks to my friend Daniel for suggesting it.

And now I’ve decided to the Ubuntu Live on my Dell Inspiron 9300 work laptop (Intel Pentium M 1.86, 2 GB RAM, ATI Radeon Mobility X300, Seagate ST910021A 7200rpm HDD) – very happy with my 3 year old Windows XP Professional, curious to see how it compares. Ubuntu ran so well that I decided to install it on it’s own partition, with the intention to keep the Windows boot manager.

The installation was a breeze, the live CD has all the necessary tools – resized one of the partitions to make some room for a dedicated 5 GB partition for the data, no swap for now. I was a bit worried that it might not fit, but in the end it installed everything and even left 2.7 GB free! nice work, Ubuntu.

Decided to install the GRUB boot loader on the Ubuntu partition (in my case /dev/sda4) and then rebooted. As expected, the Windows XP boot manager was still there, with the normal entries, no Ubuntu.

Then I found this post explaining how to extract the Linux boot sector into a file (ubuntu.bin) and add it as a boot entry in Windows XP boot.ini. For that I had to boot back with the Ubuntu Live CD, run the command (obviously change to match your partitions):
sudo dd if=/dev/sda4 of=/media/Windows/ubuntu.bin bs=512 count=1
Reboot back to Windows XP and added the entry c:\ubuntu.bin="Ubuntu 9.04" to boot.ini:


Restart and there it was in the boot menu - selecting the Ubuntu 9.04 entry presents the Grub boot entries, allowing to start the newly installed Ubuntu from hard-drive.

Quite impressed (I know I’m repeating myself, but I really am). The UI runs fast, still to do some customisations (managed to map Win+D on my home Shuttle to show the desktop), but overall it seems to runs nicely, quite friendly and had no installation problems at all.

I’ve been trying Ubuntu on my home Shuttle (P4 Prescott 3 GHz, 2 GB RAM, ATI Radeon 9600XT, 7200rpm HDD) and I wasn’t impressed at all, in my opinion Windows XP runs much better on that machine. Same as I tried Windows 7 on it and didn’t impressed either, it ran well with visual effects and all, but not as responsive as I expected. I guess what I’m trying to say is, you should be open minded and try a few OSs to find the one that works better for you on your system - especially nowadays when there's plenty of live boot Linuxes to try and Microsoft opening up and releasing Windows preview / beta versions.

Tuesday, June 30, 2009

Add Ubuntu 9.04 boot entry to Vista / Windows 7 boot manager

I installed Ubuntu 9.04 on my old Shuttle box a couple of months ago to test some of my plugins on XBMC for Linux. The installer was smart enough to included the Windows XP boot entry and all was good until I installed Windows 7 later on, overwriting Grub with it’s own boot manager.

EasyBCD was the first thing that came to mind, they even have this tutorial on how to add Ubuntu to Vista loader. Adding the Ubuntu partition as per tutorial didn’t do it for me, and then I found this post explaining how to use EasyBCD to install NeoGrub.

I’m not a Grub expert so I went on and booted with Ubuntu Live CD to get the original /boot/grub/menu.lst, saved it on a temp directory on one of NTFS partitions, came back and booted in Windows 7. Run EasyBCD and follow the post to add the NeoGrub boot entry and saved the menu.lst directly in F:\NST.

Choosing the Ubuntu 9.04 boot entry now starts Grub showing it’s own boot entries, but you I could probably customize menu.lst so that it starts Ubuntu directly (timeout=0, default=0).

easybcd_neogrub

Catalyst 9.3 Vista legacy drivers on Windows 7

I had a problem starting XBMC on Windows 7 on my old Shuttle destkop with an ATI Radeon 9600 XT graphics card and the default W7 graphics driver – ATI discontinued support for a bunch of old graphic chips including mine, I went and on ATI website for a driver for Windows 7 and Radeon 9600 is not in the list anymore.

Luckily MerlinUK posted on ATI forums how to install the ATI Catalyst 9.3 legacy drivers for Windows Vista on Windows 7 and it works, XBMC running fine now, see below.


http://forums.amd.com/game/messageview.cfm?catid=279&threadid=111846

MerlinUK
04/12/2009 08:38 PM

I have been trying to find a way of installing Catalyst 9.3 in Windows 7 to support my X700 AGP card. After a bit of trial and error, I have found a way that this can be done. This not only installs the 9.3 drivers but also allows use of Catalyst control center. This method should work for all legacy cards supported by catalyst 9.3.

There are five Step to the installation although step five is optional.

Step 1: Start the installation as normal upto main installation then cancel. This will extract the driver files to your hard drive.

Step 2: navigate to C:\ATI\Support\9_3_vista32_win7_32_dd_ccc_wdm_enu\pakages\drivers\display\LH_INF. Open in notepad CL_76828.inf and look for the following entry;

[Manufacturer]
%ATI% = ATI.Mfg, NTx86.6.0, NTx86.6.1

edit it to read

[Manufacturer]
%ATI% = ATI.Mfg, NTx86.6.0

and save

Step 3: manually install the display driver by clicking on start and entering Device Manager in the search box select your graphics adaptor and update driver select the second option and have disk browse to the inf file you saved in Step 2. Windows will display a warning but click yes

Step 4: Navigate to; C:\ATI\Support\9_3_vista32_win7_32_dd_ccc_wdm_enu and run setup this will install the Catalyst control center without error. reboot and hey presto

Step 5: Not strictly needed but will save you having to do the above again if you have to re-install Windows 7, save the ATI folder to a USB drive or CD. Just follow steps 3 & 4 in any order.

And that is it, hope this helps...

Saturday, June 6, 2009

E3 2009: Project Natal Milo demo

http://www.xbox.com/en-US/live/projectnatal/

Lionhead Studios' Peter Molyneux has shown off a game character that recognises and responds to a player's mood.

The human interaction system is possible with Natal, a system being developed for the Xbox 360.

Wednesday, May 20, 2009

Installing Sun VirtualBox guest additions for Ubuntu

I found that Ubuntu 9.04 works better in Sun’s VirtualBox – the cursor was way off in Microsoft’s Virtual PC - the only problems were the screen resolution and the annoying bit with capturing the mouse and having to use the scape key. That is until I found that Sun provides guest additions for Ubuntu, see this post here on how to install.


Wednesday, May 6, 2009

Windows 7 RC on ASUS R2H

I hope Microsoft fixed everything in this version as I’m getting a bit tired of installing all these Windows 7 releases :-) to be honest though is not the actual Windows installation as that takes only about a half an hour and it needs your input only on a couple of things, but installing all the other drivers and apps, and lastly to customize things as you prefer.

Probably because I rarely use computers for leisure and mostly for work or doing some coding for a hobby (some may find sad the idea of having a hobby same as your main occupation :-), I like my computers running quick with little visual effects, although luckily for me and my job, I do try to keep a balance between useful and pretty as much as possible when developing stuff. In this case, with the R2H I prefer it to be a little snappier rather than waiting for drop-down to come down nice and slow, anyways you get the idea. Some of the customisations include changing from Segoe UI font back to good old Tahoma 8pt (some of the windows I noticed keep using Segoe even after the change), removing the wallpaper, disabling ClearType (I usually like texts nice and crisp, except maybe for a few specific applications like Adobe Reader or in coding editors), setting the System Properties > Performance Options for best performance, except maybe for Show shadow under mouse pointer (ironically, I still keep this one...), Smooth edges on screen fonts (that’s the basic font smoothing) and Use visual styles on windows and buttons (I don’t use this one on XP, only on W7, that much I like the theme in W7 :-), setting up Process Explorer to startup minimized when logging on (like to keep an eye on the system) and some changes in Explorer, like showing all file extensions, displaying the full path in the titlebar, sorting by default by type and applying the settings to all folders, enabling single click to open items etc. Enough about me, back to Windows 7 RC...


Finishing the installation from a DVD-RW, you need to connect it to the Internet through the Ethernet cable and that should install about 6 updates: Atheros Wireless driver, AuthenTec finger-print driver - a nice addition Dave spotted earlier, Intel 915 chipset driver, ATK Input ACPI utility and a couple of IE8 related updates. There’s also an optional Realtek wired network driver, checking that box as well. 38 MB worth updates and a reboot later, we have a nice and slightly slow R2H running W7 :-) only messing, doing the above will make it snapier without much loss of the actual W7 experience.

Touch Screen

Working fine, it needs calibrating.

Graphics

The default drivers works fine, although I’ve noticed W7 installed Standard VGA Graphics adapter which scores a double 1.0 in Windows rating and I’ve also noticed some flickering in Google Chrome dialog windows and when running Mobility Center when it’s being drawn up, which is just as well, we are going to install the ASUS Intel Graphics driver for Vista v6.14.10.4764 (in Windows Vista SP1 compatibility mode). After rebooting, noticeably less flickering and scoring now 1.9 in desktop performance and same 1.0 in 3D – still no Halo3 on R2H :-)

Sound

Same as before, the output doesn’t switch automatically from headphones to speaker, install ASUS Audio driver for Vista v6.10.1.6030.

WebCam (Bison)

Not installed by default, detected as USB2.0 Camera, install ASUS drivers for Vista v6.32.0.04.2 (if you don’t have a Bison webcam user your Vista driver or download the appropriate one from vip.asus.com, they explain which driver to download based on hardware IDs).

Some may find interesting, Dave reported earlier he uses ASUS SmartLogon for face recognition for logging on in W7 (no download link just yet, google yourself for “ASUS SmartLogon download”).

Thumbstick

Same as before, install the ASUS Touchpad driver for Vista v9.1.5.0 for better sensitivity and click on push.

Wired network (Ethernet)

Works fine out of the box, there is a newer driver through Windows Update.

Wireless (Atheros)

Same as before, works fine with the default driver, the ASUS Wireless Console for Vista v2.0.8 needs though the ASUS Hotkey Utility v1.00.0012 to be able to enable/disable the device and to get the wireless hardware button working.

GPS

Works fine, use the Device Switch utility for Vista v1.0.0.1 to enable the device.

Fingerprint sensor

Driver is now delivered through Windows Update, go to Control Panel > Biometric Devices to enable and register your fingers.

ASUS Settings Center

Install ASUS Hotkey Utility v1.00.0012 then install ASUS Settings Center v1.6.7.115, then reboot or at least logoff and then log back in. Same as before, brightness and volume work ok, for resolution you need the ASUS Intel Graphics driver for Vista v6.14.10.4764.

Note: I couldn’t get the resolution to switch I changed output to Single Display: Notebook from the Intel Graphics Media control panel. The application flickers a lot when you click Ok / Apply, best to use the Enter key on the 15 second OK button otherwise clicking with the mouse it might not work and reverts back to previous settings.

Hibernation

I noticed Hibernation wasn’t available as an option until I installed most of the drivers above – probably one of them wasn’t fully supporting ACPI, I don’t know exactly which one… Resuming for hibernation is fast as in previous builds.

Final thoughts

Looking at Process Explorer > System Information, Windows 7 RC has pretty much the same memory footprint (with disk swap disabled, and default services, haven’t stopped any just yet, like for example the Print Spooler and other’s I’ve listed in original post in the performance tips section). The system feels unnoticeably slower, but that may be because I haven’t stopped any services just yet, nor uninstalled any features I don’t use or maybe it’s just me, or maybe it needs a defrag :-)

Haven’t had any problems, except for a message popped up twice about a “USB device not recognized”, but that may be specific to my setup, when I used it at my desk I connect everything through a hub, including a Thermaltake Mobilefan II, which probably doesn’t send any information back to Windows, just powers from the USB port.

Friday, May 1, 2009

The case of slow Windows Explorer with large number of files…

There’s always one of those cases when your Windows is getting really slow exactly when you don’t need that, you already have your own work problems and now this. You get angry and start thinking not very pleasant things to say to all those hundreds of people they’ve been working on Windows and come up with lots of ways to punish MS by boycotting their software blah blah all and all that.

Well, it just happens that sometimes is not their fault at all :-) Really? :-) Yeah, sometimes. In my case, we have been processing a lot of customer data lately and that gave us a few good hundred thousand of XML files, which sometimes we have to use Windows Explorer to move around, search or delete. You might say there are better file managers out there, and I’ve tried a few like Total Commander and Free Commander, but they were pretty much as fast and they managed to hang pretty much like Windows Explorer did.

I beared it as long as I could and then it stroke me, what if Explorer is doing more than it should? This is where FileMon enters the stage – I used the opportunity to say a big thanks to to Mark Russinovich and Bryce Cogswell for writing it and making it available to us all, for free.

And what do you know, after selection a bunch of files using CTRL+A (no problems there), for operations like CTR+C or right-click on the list, or even after you push the delete icon and when it says “Preparing to delete”, there’s a REALLLY LOOOOONG list of lookups on C:\Program Files\WinRAR\formats\ directory! what?! So all this time, I’ve been swearing at the wrong bunch :-)

filemon_explorer_winrar_formats 
Uninstalled WinRAR 3.80 and performed the same tests, and the difference in responsiveness is huge, given the large number of files I was working with. I’ll try to follow this up with WinRAR guys, but I guess it’s back to compressed (zip) folders for now :-)

Update 05 May 2009:

Reported the problem to WinRAR last week and Eugene Roshal, the author of WinRAR, answered the problem promptly and made a few changes in WinRAR 3.90 beta 1 - things are looking much better now!

Thursday, April 2, 2009

Windows 7 beta build 7068 on ASUS R2H

I haven’t noticed much change since build 7057 aside from a few small things. People using P2P TVs and torrents will be glad to know the new limit for half-open connections was raised to 120 where before it was as low as 10 connections, no need to use 3rd party tools to hack the tcpip.sys. This also the first leaked build that allows to choose which Windows 7 edition to install (see the feature list comparison here) – keep in mind that the key you got when downloading the build 7000 is for Ultimate edition - I found it complained when I chose to validate it with Professional edition, there might be some upgrade feature somewhere. There’s also a new build of Windows Media Player, 12.0.7068.0. Windows Experience Index is same as build 7057.

A few small performance tips, if you haven’t got a lot of those already :-)

  • Choose No Sounds scheme – that might speed things up a bit when moving about in Explorer;
  • Also for Explorer, in Folder Options choose Always show icons, never thumbnails.
    Since already there you might want to deselect the Hide extensions for known file types (I always found that one creating more confusion than being actually helpful);
  • Go to Device Manager > Disk Drives > HTCxxxxx ATA Device > Policies (tab) and select the Turn off Windows write-cache buffer flushing on the device, see if it helps with I/O performance:

w7_write_cache_flush

Saturday, March 21, 2009

Removing recovery partition on ASUS R2H

Looking at the partitions trying to fix the bootloader problem I have lately I noticed the hidden 4 GB ASUS recovery partition I completely forgot about. That partitions has been there for a while and to be honest I’m not even thinking to go back to Windows XP Tablet so I might just as well use that space – Windows Vista SP2 release candidate said “no” without another 3 GB of free disk space, so I might just as well reallocate some of that space.

Note of advice: Do BACKUP YOUR IMPORTANT FILES to DVDs, external drives or even other computers before you start, otherwise you will kick yourself later on if something goes wrong. You could also use a disk imaging software to backup the recovery partition if you think you might need it back someday.

R2H remove recovery partition (1)

Reading a few articles on the web and playing with the Vista Disk Management (diskmgmt.msc), I noticed the new Extend / Shrink menu entries and I thought I might get away with deleting the recovery partition, extending the next one (D), maybe shrinking it a bit leaving some unallocated space to the right and extending the next one (C) to include it. Well, that was the plan anyways, so the first step is to delete recovery partition…

R2H remove recovery partition (2)

Next step, enlarging the next partition… What? Extend volume entry is not enabled? Like a proper computer user, I always hope for the best and read the manual only when having a problem “Extends the volume with focus into next contiguous unallocated space. For basic volumes, the unallocated space must be on the same disk as, and must follow (be of higher sector offset than) the partition with focus”… b#*!0&$()s, I was just hoping to get this done quickly! Never surrender, we just need a bigger hammer…

R2H remove recovery partition (3) Next on the menu, Gparted Live CD – I read this article on The How-to Geek blog a while ago and looks like the proper tool for the job, let’s give it a try, what’s the worst that could happen, I backed-up my data, right? right…

Download the bootable ISO image from the Gparted project website, the latest stable version as of now is 0.4.3-2. Before writing that on a CD/DWD verify the checksums, otherwise it won’t boot and you will have to do it all over again. Then write that onto a CD/DVD-RW and boot the R2H from it.

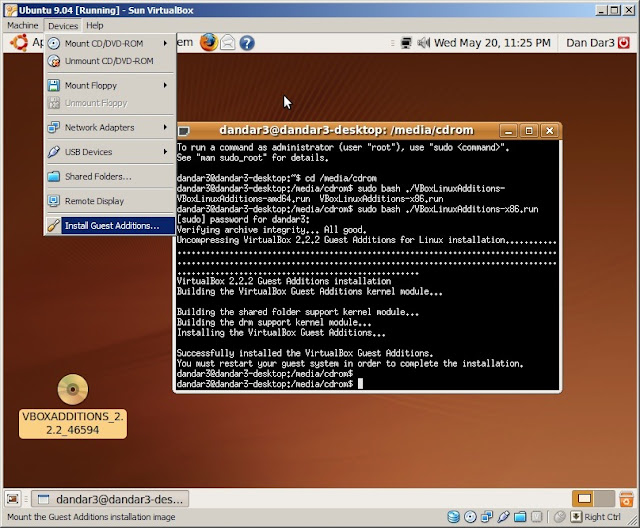
Unfortunately the bad news here is that Linuxes don’t like ASUS R2H that much and as I remember I tried not too long ago to install Ubuntu and I had the same problem, the video won’t initialize correctly in X-Window (gradually goes to a bright white full screen) without a few configuration changes. While I tried to get it working for a couple of hours with no luck, too tired and disappointed to continue, it struck me! hey, how about using that VGA dongle to connect to a monitor / TV set, maybe when it boots up it will switch to using it and everything will work fine. And it does!!! :-) 3 hours later, but it does.

Booting up the Gparted Live CD there is a menu with a few choices, the first one (default) works just fine - GParted Live (default settings), wait for Linux to loading all it’s stuff for about a minute, then in the keymap configuration menu choose the default option - Don’t touch keymap, language (default 33 = US English), Video mode, 0 (default) – that should work fine, now that we’re using the external monitor and voila, GParted loads up in X-Window, finally.

gparted_1

Reading this comment on the HowToGeek post on how leaving the Round to cylinders unchecked might speed up the process, I tried it once, as well as doing all the resizes in one go but it failed the checks when it started to resize/move the first partition, something about Can’t have the end before the start, which should probably read can’t have the new start before the old end?!… Anyways, I started again this time applying the changes one at a time WITH the cylinder aligning feature on. (note: I think the cause of the problem was not selecting the round to cylinders feature, and still could’ve done all the steps in one go, but hey maybe next time…)

First selected the /dev/dha1 partition (C:), right click and chose Resize/Move, then in the dialog window drag the side left arrow margin or simply type in 0 in the Free Space Preceding. I only wanted to round the C: partition to 10 GB and transfer the rest to D: partition, so I left the 3.4 GB of free space to the right.

gparted11

Click Resize/Move button and then the Apply button in the main toolbar to start making the changes. It will take some time to move the data, ~15 minutes - this is how it looks after.

gparted12

Same process for the second partition, select the /dev/hda2, right click and choose  Resize/Move. I wanted to resize this one to 15 GB (15 * 1024 MB) and leave the rest of 415 MB for the third partition.

gparted13 Same as before, click Resize/Move and then the Apply button to make the changes. This will take a little longer, ~20-25 minutes and here is the after look.

gparted14Now, my third partition is an extended one and I need first to resize the extended partition first  and then the internal logical partition. Same as before, select the extended, Resize/Move, drag the slider, leaving no space before or after, then the same treatment for the internal logical partition, then Apply. I ran the two operations together, it doesn’t make it faster, but it gives you a chance for a longer break, maybe even dinner :-)

gparted15

gparted16

And we’re done, resizing and moving anyways…

gparted17 … because the system is not booting anymore – in my case a blank screen. We’ll have to use the Windows Vista Recovery DVD to repair the Vista bootmanager. If that doesn’t bring back the boot menu back, we need to do the work ourselves if Vista can’t recover itself, following the steps in Neosmart’s excellent Vista recovery guide.

[couple of hours later…] Unfortunately, I wasn’t able to recover the Vista bootloader, tried a few things even the Windows 7 repair menu, with no luck - I went on eventually and re-installed Windows 7 on the same partition as before. Obviously this might not suite everyone, so I would recommend doing all the above when you are prepared to reinstall the OS as well…

Friday, March 20, 2009

Network Monitor v0.7

Network Monitor, 0.7 - 19 March 2009

[download: binaries | sources]

  • various small visual changes: new menu (view log & about), new “Started at” field, program icon, about dialog etc;
  • show only connected wireless and Ethernet network adapters;

Network Monitor v7.0

Wednesday, March 18, 2009

Windows Vista bootloader repair

As per previous post, I had Windows Vista on C: partition and installed Windows 7 beta build 7057 on a D: partition, upon next boot my Vista boot entry was gone.

r2h_partitions

I managed to restore Vista boot entry using Windows Vista Recovery Disk from Neosmart.net – kudos to them for making it available as a torrent download – wrote it on a disc and went a couple of time through the automated repair process (see more details here on how to use the recovery disk) and managed to recover both Vista and Windows 7 boot entries, but only Vista is bootable now. I had Vista’s tcpip.sys “fixed” to allow for more half-open connections, and I eventually had to use the console from the recovery options, go into your \Windows\system32\drivers, delete / rename tcpip.sys and copy tcpip.copy (that’s how my backup file was named) as tcpip.sys, as Vista was complaining that tcpip.sys was corrupt.

Trouble is that now with Vista boot entry restored, I cannot boot into Windows 7, the Windows Boot Manager complains with error 0xc0000428, file: \Windows\system32\winload.exe, “Windows cannot very the digital signature for this file”. Now, if I understand correctly from reading this article, it seems that as part of the security checks the Vista Boot Manager is checking various boot files, one of them being winload.exe, which leads me to the conclusion that Vista Boot Manager doesn’t approve of Windows 7 boot files, and same goes the other way around (don’t actually recall the other boot message last night, it was late it could’ve been the same as about on tcpip.sys or this new winload.exe signature thing).

Reading A few more changes from Beta to RC I noticed this change:

25. Dual Boot partition drive letter assignment

For a dual boot configuration for the Beta, the other Windows OS wouldn’t get a drive letter and therefore wouldn’t show up in explorer.  We heard overwhelmingly from Beta customers that the lack of a drive letter was confusing and even caused some to believe that their secondary OS was lost. Assigning the drive letter makes it visible in explorer and aids in navigation across OS installations.

While I’ve noticed in W7 beta the Vista partition was not showing up in Explorer and now in build 7057 was back in, I wonder if this change might have something to do with my issue here… Must be something to do with both Vista and W7 naming C: the partition was being installed on and renaming the other ones – anyways, after lots and lots of googling for Vista and W7 dual-booting and bcdedit command parameters, I’m even more confused and couldn’t find much relevant info, so I’ll give up for now…

Tuesday, March 17, 2009

Windows 7 beta build 7057 on ASUS R2H

Warning: You should consider making a note / saving the BCD settings with EasyBCD or similar before installing this build, as it lost my Vista boot entry, although I installed Windows 7 on a separate partition, no upgrade.


* * *

Following Rudi's comments that some things have been fixed in build 7057, I gave it a try myself and here are my notes.


Same as before, I installed it from a DVD-RW disc and into a 9.5 GB disk partition, with about 2 GB free left. The wireless adapter is not detected automatically, you will need to connect your tablet through the wired (ethernet). The first Windows Update run installs an update for Intel 915 Express chipset, Atheros ASUS USB Wireless, ATK0100 and Realtek RTL8101E Ethernet. Rebooting...

Rebooting brings only good news - I see now the Intel Graphics Media icon in tray area, things like rotation seems to work fine, going into graphics Properties, doesn't seem to know about the 800x480 screen resolution, but it still looks fine on screen - again this is the default Windows driver, not ASUS driver version 6.14.10.4543.

Screen calibration works fine now, you can use the pen close in the corners now, kudos to Windows 7 developers, seems they listened to all that feedback we all sent.

A new wireless driver was installed and it seems to work fine, detected my wireless network no problems - btw, I like the new popup window that shows the wireless connections... I might install the ASUS Wireless Console, it seemed to me it saves a bit more battery when I disable it using the console, as opposed to using the Windows Mobility Center.

More good news, now we have a Windows Experience Index of 1.0, not too bad considering the last time it was freezing half way through the rating process – again, good job MS.


So, to recap…

Touch Screen

Calibration works fine now, you can access the screen right close into the corners.

Graphics

Windows Update will install a new Intel graphics driver, but oddly enough this is version 6.14.10.4543, older than the ASUS Intel Graphics driver for Vista v6.14.10.4764. You need the latter to change the resolutions through the ASUS Settings Center. Same as before, you have to install it in Windows Vista compatibility mode, otherwise the installer will complain.

Sound

The default driver works with a few problems, I’ve noticed sound corruption (pops) on high volume on headphones and no speaker output when you unplug the headphones. You have to go to Control Panel > Troubleshooting > Troubleshoot Audio playback wizard to change the speakers to the default device, and then the same back to headphones if you want to switch. None of these if you install the ASUS Audio driver for Vista v6.10.1.6030.

WebCam (Bison)

Not installed by default, detected as USB2.0 Camera, works fine with ASUS drivers for Vista v6.32.0.04.2. Tested with Live Messenger, which works fine now, btw, good job MS.

Thumbstick

Same as before, you have to install the ASUS Touchpad driver for Vista v9.1.5.0 to get better sensitivity and click on push.

Wired

Works out of the box, newer driver installed with first Windows Update.

Wireless

Works fine after first Windows Update. The ASUS Wireless Console for Vista v2.0.8 work fine as well, with the note that you need to install the ASUS Hotkey Utility v1.00.0012 not only to get the hardware button to work, but apparently even to be able to disable the device from it.

GPS

Works fine. I used the Device Switch utility for Vista v1.0.0.1 to enable the device and tested with Microsoft AutoRoute 2007.

Fingerprint sensor

It is detected as an unknown Fingerprint Sensor and then I went straight on to install the AuthenTec update Windows 7 beta suggested the last time. And wow, it actually works now! Go into Control Panel > Biometric Devices, choose to use the AuthenTec AES1610A device to logon in Windows and enroll your fingers and that’s pretty much it, nice and easy. I understand Windows 7 introduces a new Windows Biometric Framework to provide a common API and tighter Windows integration, where before each manufacturer had to come up with their own set of apps and solutions.

ASUS Settings Center

Install ASUS Hotkey Utility v1.00.0012 then install ASUS Settings Center v1.6.7.115, then reboot or at least logoff and then log back in.
 
You can control brightness and volume, bad news on changing the resolution, but if you miss it badly I’d say you can install the ASUS Intel Graphics driver for Vista v6.14.10.4764.

Hibernation

While I cannot judge whether going into Hibernation is faster, resuming is noticeably faster!

Performance Tips

Not going to go through that again, see the previous post on how to disable certain services and features if you are not happy with the performance.

Final thoughts

I don’t know if I missed anything, feel free to remind me if I did. Except for the Vista boot issue, Windows 7 build 7057 looks pretty good, lot of things were fixed and it looks as promising as the beta version.

Here’s my 1.2 GB RAM system looking with swap disabled and bare minimum running.


Saturday, March 14, 2009

Pydev - Eclipse plugin for Python development


What is Pydev?

Pydev is a plugin that enables users to use Eclipse for Python and Jython development -- making Eclipse a first class Python IDE -- It comes with many goodies such as code completion, syntax highlighting, syntax analysis, refactor, debug and many others. If you want more details on the provided features, you can check here.

Pydev and Pydev Extensions are now products of Aptana, makers of the popular Aptana Studio, Eclipse-based IDE for Ajax, Jaxer, Ruby on Rails, and PHP. You can plug Pydev into Aptana Studio or both into Eclipse and use them side by side. Aptana plans deeper integrations in the future.

* * *
 
As I was writing the post on Notepad++ the other day it just stroke me - there must be a plugin that allows all the Eclipse goodness for Python coding. A nice editor with highlighting, auto-completion, navigation to methods / variables would be very hand especially to Python newbies like myself. Having all the tools at hand, the project explorer, the editor windows, the team / SVN synchronisation, hey I should've thought about that while ago - I guess I was doing alright with Notepad++ and RapidSVN, but now this should be even better.

The installation was quite a breeze, the Pydev Getting Started section is very helpful with plenty of details and screenshots. They also have a couple of video tutorials, that should help getting started, especially if you are not the usual Eclipse user.

I managed to install the plugin in both Eclipse 3.4.1 and 3.5 M5, the other thing I had to do was to get the Subversive plugin and connectors from Polarion. My Eclipse 3.4.1 was installed from the Eclipse IDE for Java EE Developers 3.4.1 bundle (hmmm, I see there is 3.4.2 bundle out now...) so I didn't have to install anything to get the XML editing; for Eclipse 3.5 M5 I installed the Web Tools Platform 3.1 integration – that is probably a bit too much if you are only going to use it for Python, but it doesn't hurt if you use the same Eclipse for Java as well.

Here are some screenshots:


Thursday, February 12, 2009

Windows XP Professional Fast Logon Optimization

This is been an issue at work for a long time, where due to the Fast Logon Optimization being enabled by default in XP Pro, the user was able to logon before the network connection was established and the netlogon script wasn't able to connect the network drives. While this problem was fixed by IT a while back through domain policies, I still didn't know how exactly and I just had it more recently on my stand-alone development box, that's not connected to any domain - the box was configured to autologon and run a few scripts at logon that required the network connection. As the box was booting quickly, before the network adapter was properly configured through DHCP, the scripts were failing to run.

In the end I just found that using the Group Policy Editor (gpedit.msc) you can disable the Fast Logon optimization by setting the following policy setting:

Computer Configuration\Administrative Templates\System\Logon\ Always wait for the network at computer startup and logon = Enabled