

Tuesday, December 20, 2011
Saturday, December 10, 2011
PeerBlock

PeerBlock lets you control who your computer "talks to" on the Internet. By selecting appropriate lists of "known bad" computers, you can block communication with advertising or spyware oriented servers, computers monitoring your p2p activities, computers which have been "hacked", even entire countries! They can't get in to your computer, and your computer won't try to send them anything either.

Saturday, November 26, 2011
Sunday, November 6, 2011

Parsing large XMLs with XmlReader and XmlSerializer (C#)
Having discovered the other week XmlSerializer (used it to save / read application settings in XML) I went back to another application I’m writing for work that analyses Microsoft SQL Server Profiler trace XMLs and try to use with that as well.
Now these XMLs are fairly large, from hundreds of MBs to GBs. I used XmlReader in the first place so it didn’t load the whole XML in memory, but the program was fairly slow with large ones and the code was about 2 or 3 pages, testing for node names, attributes and all that.
Decided to rewrite it using XmlSerializer, and to my surprise the performance increased quite a bit (true, it was maybe mostly due to the way I wrote it the first place with one loop that did xmlReader.Read() and then checking for IsStartElement() and all that spaghetti that needs to go with it), while making the code much cleaner.
Microsoft SQL Server Profiler XMLs look like this, with Event entries, each with multiple Column elements:
1: <?xml version="1.0" encoding="utf-16"?>2: <TraceData xmlns="http://tempuri.org/TracePersistence.xsd">3: <Header>4: [...]5: </Header>6: <Events>7: <Event id="45" name="SP:StmtCompleted">8: <Column id="11" name="LoginName">USERNAME</Column>9: <Column id="15" name="EndTime">2011-09-12T13:20:45.813-07:00</Column>10: <Column id="10" name="ApplicationName">Microsoft SQL Server JDBC Driver</Column>11: <Column id="12" name="SPID">190</Column>12: <Column id="14" name="StartTime">2011-09-12T13:20:45.813-07:00</Column>13: <Column id="16" name="Reads">2</Column>14: <Column id="18" name="CPU">0</Column>15: <Column id="1" name="TextData">SELECT COUNT(*) FROM "TABLENAME"</Column>16: <Column id="9" name="ClientProcessID">6896</Column>17: <Column id="13" name="Duration">105</Column>18: <Column id="17" name="Writes">0</Column>19: </Event>20: [...]21: </Events>22: </TraceData>23:
The Column.cs clas for Column nodes:1: using System.Collections.Generic;2: using System.Xml.Serialization;3:4: namespace XmlSerializerTest5: {6: [XmlRoot(ElementName="Event", Namespace="http://tempuri.org/TracePersistence.xsd")]7: public class Event8: {9: [XmlAttribute("id")]10: public string ID { get; set; }11:12: [XmlAttribute("name")]13: public string Name { get; set; }14:15: [XmlElement("Column")]16: public List<Column> Columns { get; set; }17: }18: }19:
And the main parser code (XmlParser.cs) as is simple as:1: using System.Xml.Serialization;2:3: namespace XmlSerializerTest4: {5: [XmlRoot(ElementName="Column", Namespace="http://tempuri.org/TracePersistence.xsd")]6: public class Column7: {8: [XmlAttribute("id")]9: public string ID { get; set; }10:11: [XmlAttribute("name")]12: public string Name { get; set; }13:14: [XmlText]15: public string Value { get; set; }16: }17: }
1: using System;2: using System.Collections.Generic;3: using System.Xml;4: using System.Xml.Serialization;5:6: namespace XmlSerializerTest7: {8: class XmlParser9: {10: public static List<Event> Parse(String fileName)11: {12: // Init13: List<Event> events = new List<Event>();14:15: // Parse...16: using (XmlReader xmlReader = XmlReader.Create(fileName))17: {18: // XmlSerializer...19: XmlSerializer EventSerializer = new XmlSerializer(typeof(Event));20:21: // Parse XML - "Event" nodes...22: while (xmlReader.ReadToFollowing("Event"))23: {24: Event eventObject = (Event) EventSerializer.Deserialize(xmlReader.ReadSubtree());25: if (String.Equals(eventObject.Name, "SP:StmtCompleted"))26: {27: //28: events.Add(eventObject);29: }30: }31:32: // Cleanup...33: xmlReader.Close();34: }35:36: // Return value37: return events;38: }39: }40: }
Everything is parsed for you by the XmlSerializer.Deserialize() – yes, there may be an overhead in parsing stuff that otherwise maybe you were interested in, like columns you didn’t want in the first place and could add up in memory, but if code readability and maintainability is more important, to reduce memory I guess you could go and trim them from the list after the elements are parsed.
The above code goes through a 250 MB file in about 6 seconds on my Intel P8600 laptop (measured with StopWatch) and it uses about 37 MB of RAM (private bytes).
I guess the interesting parts are the XmlReader, XmlReader.ReadToFollowing(), XmlReader.ReadSubtree(), XmlSerializer.Deserialize() and the Xml annotations in the Event and Column classes – I’m not going to go into details on those, there’s plenty examples on the web and documentation on MSDN.
The reason why I posted it in the first place was that I thought it might be of help to someone else learning C# like myself, and see a working example and what makes it tick.
Wednesday, November 2, 2011
Eclipse – FindBugs plugin

http://findbugs.sourceforge.net
FindBugs™ - Find Bugs in Java Programs
A program which uses static analysis to look for bugs in Java code. It is free software, distributed under the terms of the Lesser GNU Public License. The name FindBugs™ and the FindBugs logo are trademarked by The University of Maryland. As of July, 2008, FindBugs has been downloaded more than 700,000 times.

Wednesday, October 26, 2011
Cleaning your laptop fan
I thought at first that it wasn’t able to cope with today’s Flash applications and things like Yahoo Messenger and so forth – it’s an old 1.2 GHz Pentium M Mobile CPU – but man you should’ve seen the crap it collected in there over the years; dust burned to a black char got stuck in the radiator and the fan was struggling to push the air out without much success. I should’ve taken a few pictures, but it didn’t seem like something anyone would do, I said ok it had its years, it only happens to old laptops...
And I couldn’t be more wrong, cause the next day I said, ok how about my 2 years old Dell Vostro? Luckily Dell Vostro has a much better design where you can access the memory, fan and the CPU under this panel held by a couple of screws. Below you can see a couple shots with the crap in the radiator and fan blades.
To clean up, I use pressurized air and an old toothbrush for radiators, then for the fan blades cotton swabs with medicinal spirit, slowly going through the blades holding the fan so it doesn't rotate to make it easier - it’s not like I do it every day and 5 minutes later you’re done anyways.
It made quite a bit of difference to the old laptop, the fan doesn’t go on high as often and the one on my Vostro barely kicks in every now and then. For some reason I thought before blowing air (pressurized or human powered) through the vents was enough to get the stuff out of the fan, now I think I will do the real thing again every couple of years.


Sunday, October 16, 2011
Windows 8 Preview installation using Network Boot (PXE)
Somehow I always thought booting through PXE would be easy (just as easy as the USB or DVD boot) – and how wrong I was, as it requires both a DHCP server that allows to specify a boot program and TFTP server, neither of which is easily found on the net (details on Intel Boot Agent).
Eventually I did stumble onto TFTPD32/64 and Serva32/64 – both looking fairly similar which is fair enough cause the second is based on code from the first one. They seemed to have done the job well for other people, but for me the embedded TFTPD server failed a lot on transferring the BCD store during tests with a local VM, so I finally stopped using that and eventually found SolarWind TFTP Server much more reliable.
To make things even more complicated, you have to prepare the boot image with Windows PE (Preinstallation Environment) – you can find a lot more information for that one the web, but it does require quite a large download of the Windows Automated Installation Kit (AIK) – in my case I downloaded version 3.0 for Windows 7.
A few things to note about my setup
Since I already have a router on the network with a DHCP server running, to avoid conflicts I used an Ethernet hub I had around to connect the two laptops directly. I manually setup the Ethernet adapter on my “server” to use 10.0.0.1 IP address (easier to type) and disabled the firewall as well as the wireless adapter for the duration of the exercise (you can probably just as easily add the server programs below as exceptions to the firewall) – if you do it like me, remember to re-enable the firewall back on when finished and to set the Ethernet adapter for automatic IP allocation later on.
You may also notice that I also configured the DHCP server to server IP addresses from the same private class (10.0.0.xxx).
To point out we will prepare a 32 bit WinPE image in C:\WinPE directory and then use the C:\TFPT-Root\Boot to place the boot files (SolarWind TFTP server defaults to C:\TFTP-Root, feel free to change).
Windows PE image preparation
Installing Windows Automated Installation Kit (AIK) is fairly straight forward so I’m not going to go into details on that. For preparing the WinPE image I started from this Microsoft Walkthrough: Deploy an Image by Using PXE although I’m not going to follow it to the letter, feel free to use that if you want.Run Windows AIK Command prompt:

Run the copype.cmd command (will automatically change to the image directory and will use relative paths from then on) – remember I’m building an image for an x86 system :
copype.cmd x86 C:\WinPE

imagex /mountrw winpe.wim 1 mount

copy mount\Windows\Boot\PXE\*.* C:\TFTP-Root\Boot

Now for copying boot.sdi you can use the full path to AIK tools or simply close the console and run a new Deployment console and use relative paths.
copy x86\boot\boot.sdi C:\TFTP-Root\Boot

Back to the WinPE directory and unmount the image (cleanup).
cd /d C:\WinPE
imagex /unmount mount

Copy winpe.wim in the TFTP boot directory as boot.wim (might just work as winpe.wim, but the BCD commands below will mention boot.wim).
copy winpe.wim C:\TFTP-Root\Boot\boot.wim

Now moving on to preparing the BCD store. You might notice that instead of specifying the full path to the BCD I will change directory to the Boot directory and do it from in there. Personally I reuse the previous command (press up arrow) and change the parts at the end.
cd /d C:\TFTP-Root\Boot
bcdedit -createstore BCD

bcdedit -store BCD -create {ramdiskoptions} /d "Ramdisk options"
bcdedit -store BCD -set {ramdiskoptions} ramdisksdidevice boot
bcdedit -store BCD -set {ramdiskoptions} ramdisksdipath \boot\boot.sdi

bcdedit -store BCD -create /d "MyWinPE Boot Image" /application osloader

Note the highlighted GUID value – you will need to copy that and use it in the subsequent commands (replace {guid} with the one generated for you).
bcdedit -store BCD -set {guid} systemroot \Windows
bcdedit -store BCD -set {guid} detecthal Yes
bcdedit -store BCD -set {guid} winpe Yes
bcdedit -store BCD -set {guid} osdevice ramdisk=[boot]\Boot\boot.wim,{ramdiskoptions}
bcdedit -store BCD -set {guid} device ramdisk=[boot]\Boot\boot.wim,{ramdiskoptions}

bcdedit -store BCD -create {bootmgr} /d "Windows BootManager"
bcdedit -store BCD -set {bootmgr} timeout 30
bcdedit -store BCD -displayorder {guid}

This is what I eventually got in the Boot folder.

Sharing Windows 8 installation files
In my case, I took the Windows 8 ISO image, mounted in Virtual Clone Drive and shared it as Windows8 folder. I also created a pxe user with pxe password (you can use an existing user if it has a password assigned to it), and you will see how you will need to map a network drive from the remote computer to the installation files in order to start the actual Windows setup.
Serva32/64 DHCP server
IP pool / size : 10.0.0.100 / 100 (IP range .100 to .200)
Boot file      : Boot\pxeboot.com
Subnet mask    : 255.255.255.0

SolarWinds TFTP server

Test run with Windows Virtual PC


Old laptop (PXE booting)
Pressing F12 will continue the boot process, where it downloads the boot manager, WinPE image etc. Ignore the errors in the TFTP console about not finding boot.ini and wgl4_boot.ttf.

Eventually the remote computer will start loading boot.wim and get you the setup background and a command line prompt. Now you will map that network drive to point to the installation files (remember I created a new user pxe/pxe and shared the Windows8 installation files – the net use command will fail if a user is not specified saying something about Server service not being started).
From the remote computer console run the statements:
net use y: \\10.0.0.1\Windows8 pxe /user:pxe
y:\setup.exe
Keep in mind that when we prepared the image in the first place it was for an x32 platform and you will probably need to go through the process again to build for an x64 platform, replacing all the x86 references with amd64.
Wednesday, October 5, 2011
CLR Profiler for .NET Framework 4
And then I ran my little app processing some application logs through the CLR Profiler - looking through the allocations a huge block of 259 MB allocations jumped at me! Looking at the app from outside with Process Explorer didn’t show much memory usage but that was probably the GC doing a lot of cleanup – the collections report shows it well.
Changing the code to use a StringBuilder was not that complicated and it reduced the amount of GC work and cut the processing time in half from 20 seconds down to 10 seconds! Still more to be done, but we’re on the good track now...
CLR Profiler for .NET Framework 4
http://www.microsoft.com/download/en/details.aspx?id=16273


Tuesday, October 4, 2011
Microsoft WMI Code Creator v1.0
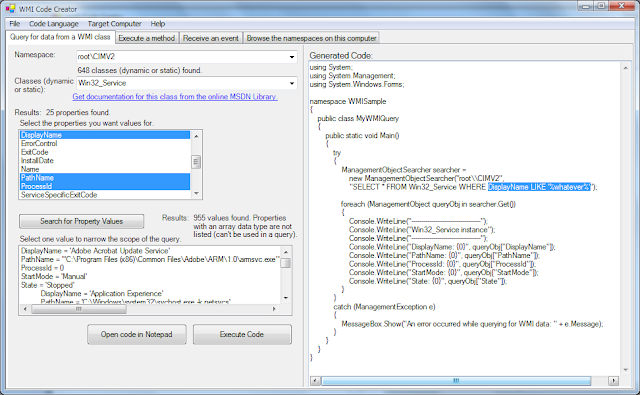
WMI Code Creator v1.0
http://www.microsoft.com/download/en/details.aspx?id=8572
The WMI Code Creator tool allows you to generate VBScript, C#, and VB .NET code that uses WMI to complete a management task such as querying for management data, executing a method from a WMI class, or receiving event notifications using WMI.
Monday, September 26, 2011
Best value mouse ever!
I was so excited by the simplicity and function of this mouse, bought it for all my work and home computers and even given some to friends – it is a shame though to see it being discontinued (just bought two more to store away :-)... I usually don’t recommend hardware to people cause nowadays it’s so easy to find all the reviews you need and people usually want to find the good stuff themselves, but I can’t resist – great, simple, easy to use mice are always underrated.
I’m talking about Microsoft Wheel Optical Mouse – great simple shape (use with either hand), no additional buttons or anything (no need to install IntelliMouse), light and easy to navigate with, long soft cord (stiffer wires usually break down where the cord enters the body after a couple of years), soft and quiet clicks with both buttons and the wheel (so handy to close those thumbnails in Windows 7 taskbar thumbnails or browser tabs with a middle click). In brief, a great, dependable, easy to use, no fuss mouse – it’s a shame to see it going away, finding it harder and harder nowadays in online stores. Well done Microsoft on this one, and goodbye old friend!

Friday, September 16, 2011
Windows 8 Developer Preview on ASUS R2H (take 2)
Here are the steps this time:
- download Windows Developer Preview English, 32-bit (x86) ISO;
- use Windows 7 USB/DVD download tool to create a bootable USB stick;
- boot from USB stick (press ESC at boot to choose to the USB stick).
It took about 30 minutes to copy the files, extract and go through the configuration screens. I reused the 13 GB partition used for Windows 7, with 4.5 GB free after installation.
Logging in with the Ethernet connected after a couple of minutes I see it managed to download a wireless driver and start seeing wireless networks available – there are more updates to apply, some for Authentec fingerprint sensor and I see a wireless driver update as well…
.png)
Interesting part is that it’s got Aero Peek and transparency with the default Microsoft Basic Display Adapter, something that wasn’t available in Windows 7. Responsiveness is pretty much on par with Windows 7 and out of the box the pen calibration is off (cursor shows above-right to the finger nail / stylus, something that I guess can be fixed through calibration).
Screen resolution is the physical 800x480, can’t seem to be able to get it higher than that – I won’t install the previous Vista video driver, never used the higher resolutions provided by the ASUS tools, found those too blurry to use, maybe once in a blue moon just to get around a window that was too tall (for most I used to drag the task bar to the right to get to the bottom of the window).
.png)
Task Manager is largely improved to show more in-depth information, where previously I had to use Process Explorer to get some of that information – should be very handy for servers (I am involved every now and then in customer performance assessments and troubleshooting – it’s nice to have the tools already on the system rather than having to download them).
.png)
.png)
Windows Explorer got the ribbon, with the ability of collapsing it using the up arrow thingy in the top right corner…
.png)
Turning a few things off: like animations and theme sounds, Offline Files, Print Spooler, uninstalling Windows Gadget Platform, disable Bluetooth device and service, SD card controller, bringing My Computer icon to the desktop (right-click, Personalisation), getting there…
Here is a screenshot of the main start screen – have I mentioned that all the screenshots were taken from an RDP connection with full theme / transparency support from my Windows 7 laptop?
.png)
I don’t know what else to try for now, I’ll set it up for normal use and see how we get along – doesn’t seem to miss anything, we’ll see how it goes over the next few weeks. I’ll take it for a bus ride maybe next week and see how the battery fares but looks very usable to me, not missing Windows 7 already.
Sunday, May 15, 2011
ECMAScript 5: The New Parts – Douglas Crockford(MIX11)
http://channel9.msdn.com/events/MIX/MIX11/EXT13
The first complete implementations of the first revision to the JavaScript, I mean ECMAScript, Standard in 10 years are now coming online. This talk will introduce the new, mostly good, parts.

Wednesday, April 6, 2011
Event ID 2019 - NonPaged Pool exhaustion…
We tried scheduling poolmon to run every minute (poolmon.exe -p -b -s -r -e -n %OUTDIR%\poolmon.%ISODATE%.log) without much luck - we’ve seen the depletion of nonpaged pool (for this Windows version = 256 MB) from one minute to the other, and with resources gone poolmon would not be able to run at all, producing an empty log file with just the header information.
Finally the other day noticing the usual slowdown then looking in Task Manager > Performance (tab) > Kernel Memory (area) > NonPaged value was very high at 259.xxx KB, quickly ran the poolmon which failed to run at first attempt, but on the second run we finally got the offender, pooltag Ica.
Not sure yet whether this relates to Citrix ICA or Microsoft Terminal Services, but personally I feel so relieved - after applying all sorts of hotfixes and blaming everything from the antivirus, the backup software, the fact that we had so many databases and users on the same machine (I know, not ideal but that was the only choice at the time)...
In normal conditions (peak times) the total NonPaged would be fairly stable at around 90-95 MB (out of 256 MB) with the top pooltag MFE0 (McAfee - Access Protection Filter Driver ?) at around 9 MB, and ICA (Microsoft - Terminal Server Driver ?) nowhere at the top with a mere ~150 KB. Then ICA pooltag takes a huge jump to 90 M when problems arise, second place MFE0 with a small increase to 13 MB.

Sunday, March 27, 2011
Windows 7 : Easy Transfer Files, Users and Settings to new or same computer
A very useful Windows 7 feature allowing to transfer your users and settings from an old computer to a new one.
Windows Easy Transfer
http://windows.microsoft.com/en-US/windows7/products/features/windows-easy-transfer
http://www.technospot.net/blogs/windows-7-easy-transfer-files-users-settings/
Thursday, March 10, 2011
How to change marked occurrences colour in Eclipse
If you use the “Mark Occurrences” feature, whenever you move the cursor to a member, local variable, method etc. Eclipse will highlight the occurrences in the editor as well as on the side ruler (for easy navigation in a large file). In newer Eclipses I think they even broken down the concept into two types – “write occurrence” for the actual variable definition and “occurrence” for when it is used.

If you want to change the default highlight colours you can do so in the Preferences > General > Editors > Text Editors > Annotations – look for “Occurrence annotation” and “Write occurrences”.

You might need to close editors and re-open them to get the new highlight colors.
Monday, January 31, 2011
PictureBox with transparent overlay picture (C#)
The trick is to change the background colour for the overlay picturebox to transparent and also change its parent. On top of that, if the main PictureBox is not in the top left corner and you want the overlay image to be centered, you also need to change the location of the overlay PictureBox relative to the new parent, otherwise it keeps the originally design margins.
In my case:
- pictureBoxMain – displays the main image, image size mode Zoom;
- pictureBoxOverlay – displays the “wait” transparent image, same size and anchoring, image size mode Center;
private void Form1_Load(object sender, EventArgs e)
{
  // Transparent background...
  pictureBoxOverlay.BackColor = Color.Transparent;

  // Change parent for overlay PictureBox...
  pictureBoxOverlay.Parent    = pictureBoxMain;

  // Change overlay PictureBox position in new parent...
  pictureBoxOverlay.Location  = new Point(0, 0);
}

Wednesday, January 19, 2011
Troubleshooting Nonpaged and Paged Pool Errors in Windows (Ben Lye)
http://www.simple-talk.com/content/article.aspx?article=970
Ben Lye uncovered a memory leak in the nonpaged pool which was crashing his servers with disquieting regularity. Luckily it was relatively easy to troubleshoot, and he's sharing the tools and techniques he used to get his servers back on track in double-quick time.
Having troubles with one of our development servers (non paged pool, event ID 2019) I found this blog post very easy to follow. Also a must read is Mark Russinovich's Pushing the Limits of Windows: Paged and Nonpaged Pool blog post going into some more detail.